Friday, 31 May 2013

Fennel Glazed Ham

My family and I often go to Suffolk on holiday, and the last time we went, we visited a delicatessen noted for its smoked hams, bacons, and other yummilicious pork products. While there we tried a fennel glazed ham that was rather nice, so I decided to create my own version, and the result turned out so well that I wanted to share it. This dish can be enjoyed hot, but I prefer to let it cool, and slice it to enjoy in a cold meats and salad meal, or even as part of a ploughman's lunch.

Fennel is a gorgeous spice with a flavour  that is reminiscent of aniseed. However, if you aren't keen on aniseed and liquorice, don't let that put you off. I can't stand liquorice or strong aniseed flavours, but I love fennel so it's well worth a try.

This recipe is for a fairly small gammon joint, if you want to cook a larger ham, then you only need to increase the amounts for the glaze as the amount of spices in the cooking liquid should be fine for the flavour. However, if cooking a particularly large joint - say a 4-5lb gammon, it would be worth doubling the spices due to the drastically increased amount of water.

Ingredients:
  • A Small Unsmoked Gammon (About 1lb in weight)
  • 1 Tbsp Whole Fennel Seeds
  • 1 Tsp Whole Black Peppercorns
  • Pinch Sea Salt

For the Glaze:
  • 2 Tsp Whole Fennel Seeds
  • 15g Butter
  • 2 Tbsp Runny Honey
  • 1 Tbsp Soft Brown Sugar


Method:
  1. To start with you will need to soak the gammon joint in water overnight. This will help reduce the saltiness of the joint, making it more tender when cooked.
  2. Take the fennel seeds for the cooking and place in a pestle and mortar with the peppercorns and salt, and lightly crush. don't pulverise the spices, you just need to bruise and lightly break them up to release the flavour of the fennel.
  3. Tip the spice mix into the bottom of a large saucepan. Drain the gammon from its soaking liquid and place it on top of the spices. Fill the pan with clean water until the joint is covered and put on the lid. Bring to the boil, reduce the heat and simmer for about half an hour. A good guide for cooking gammon joints is to cook the meat for 25 minutes per 1lb (450g) weight. So if you had a 2lb joint you'd need to cook it for 50-60 minutes. If you go over the cooking time, it won't matter too much, but too long may cause the meat to break apart. When cooked, leave the gammon to cool then remove from the water and pat dry.
  4. In the meantime, you need to make the glaze. Lightly crush the fennel seeds in a pestle and mortar and put to one side.
  5. Gently melt the butter over a low heat, and add in the crushed fennel seeds, honey, and sugar. Heat through and stir well until the glaze begins to bubble and froth. Remove from the heat.
  6. Place the gammon on a baking tray lined with parchment and brush with plenty of the glaze. Bake in the oven for 20-30 minutes at 180C, glazing the meat again two to three times during the cooking.

Wednesday, 29 May 2013

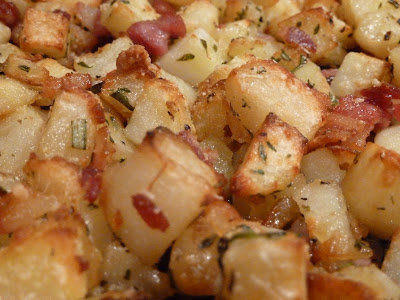
Parmentier Potatoes

I've been brought up on home cooked meals, so I've not always been huge on shop-bought ready meals. However, I always enjoyed buying pre-made parmentier potatoes from the supermarket and I alwys thought them to be more hassle to make than enough, One day, however, one day I decided to bite the bullet and have a go at making my own version. The result was seven kinds of awesome and I've never looked back. Shop bought are nice, but these, for me, are on another level. Subsequently, this has become one of my favourite potato recipes, and I thought I'd share it with you.

Ingredients:
  • 8 Medium Sized Potatoes
  • 4-6 Slices Bacon
  • Butter
  • Olive Oil
  • 20cm Sprig of Fresh Rosemary (Chopped)
  • 1 1/2 Tbsp Chopped Fresh Thyme
  • Salt
  • Pepper
  • Grated Parmesan Cheese

Method:
  1. Peel the potatoes, and cut them into 1cm cubes and place in a bowl of water to remove a little of the starch. Chop the Bacon into small chunks.
  2. Melt a little butter and oil in a large, deep-sided saucepan and fry the bacon until cooked but not crispy. Remove from the pan and set to one side.
  3. Melt some more butter (around about a 5-10 gram chunk) in the same saucepan with a little more oil for about five minutes.
  4. Mix in the chopped herbs and season with a little salt (not too much as the butter and bacon will add a certain amount of salt content) and plenty of ground black pepper. Continue to fry the potatoes until they're softened and have begun to brown.
  5. Next add in about 2 tablespoons of grated parmesan cheese and return the bacon to the man. Mix thoroughly and remove from the heat.
  6. Line a baking tray with some baking parchment and spread the potatoes across the pan in a single layer. Sprinkle with some more parmesan cheese to give an extra crisp.
  7. Bake in the oven at about 180C for 20-30 minutes or until nicely browned and crispy. Make sure to shuffle the potatoes on the tray every now and again to ensure that they cook evenly and don't stick to the paper or burn.


Wedding Favour Chocolates: A Beginning

One of my closest friends and favourite people in the world is getting married this year and as well as being a bridesmaid (and wedding cake conspirator), I have been asked to make chocolates for the wedding favours. I love experimenting and generally playing around with chocolate, so with a fairly large task ahead of me, I thought I'd blog my progress through the process.

At the moment, We're at the end of stage one and the sweets in question have been decided upon. The next step will be to do a trial run, which I will be doing at the end of June so that I can experiment with new techniques to me and check that everything works well.

So for now all I can do is list what I have planned, and as and when I get to trying things out, I will post more details.

The wedding favours will be in a small box and will consist of four different sweets, which are as follows
  • Fruit-Flavoured Fudge - For this I will be using an existing fudge recipe I have for strawberry fudge, and will experiment with replacing the colouring and flavouring with freeze-dried fruit powders in the hope that will naturally flavour and colour. I will be trying this in three flavours: Strawberry, Raspberry, and Cherry. If the powders don't work, then I'll be using food flavourings as per the original recipe.
  • Champagne Truffle Squares - This is a recipe that I found in a supermarket magazine, and have never tried before. My main experimentation with this will be the decoration, which will be using gold food spray and a stencil to create a heart motif on the top.
  • Violet Creams - With this chocolate I will be using a dark chocolate shell, decorated with a pink chocolate heart design on top, filled with a violet flavoured fondant cream. This is probably my most tried and tested recipe, that should be easy enough for me to do.
  • Rainbow Ganache Truffles - By far my most ambitious chocolate.for this I will be using a dark chocolate ganache coated in a white chocolate shell which will be decorated with a circular rainbow design. For this, I will be experimenting with colouring the white chocolate with powdered food colouring, which I've never used before. If the colour works, then the actual execution should be relatively simple enough, but time consuming.

Also for the last two chocolates on the above list, I will be attempting to use a piping bag pen to make it easier to create the designs needed. Hopefully, this should be faster than using paint brushes as I have done before. No matter the turnout though, I can't wait to get playing - though I fear that if the colouring works well, could lead to more creative chocolate decoration ideas in future.

Tuesday, 5 February 2013

Wasabi Potatoes

Back with a quick and simple recipe. Potatoes are awesome. They may be pretty bland on their own but they are so versatile that you can do pretty much anything with them. This recipe is one that came from a passing thought and works really nicely. I tend to use this as an accompaniment to certain Japanese dishes, in particular it goes really nicely with Teriyaki Salmon and Salmon Miso Mayo. There are no specific measurements for this, as it all depends on how many potatoes you want.

Ingredients:
  • Baby New Potatoes
  • Butter
  • Wasabi
  • Chives (Chopped)
Method:
  1. Cut your potatoes to the desired size and place in a saucepan. Cover with water and add in a pinch of salt. Put the lid on and boil until nicely tender - you can test this by pricking them with a knife, if there's little to no resistance, they're done. This should take about 20 minutes depending on the size of your spuds.
  2. While the potatoes are cooking, take some butter, put it into a bowl and microwave for a few seconds until soft. Now take your wasabi and squirt it onto the butter and mix with a spoon. Add the wasabi to your own taste. From experience, I've found that it takes a large amount to get the flavour, but you don't get much of the spice as the butter dilutes it a bit.
  3. When the potatoes are cooked, strain and place them in a bowl. Dot with the wasabi butter - as much as it to your taste, then sprinkle the chopped chives over the top. Mix thoroughly, and serve.

Friday, 25 January 2013

Haggis Burgers & Battered Haggis Sausages


On the 25th January each year, Scotland celebrates Burns Night in memory of one its most beloved poets, Robert Burns. I’m not Scottish, and neither are any of my family, but we always make sure that on Burns Night we have a meal of Haggis. Now, I know a lot of you have either gone ‘Bleurgh’ or are looking a little bewildered as to what this is. In essence, Haggis is a mixture of various offal, grains and spices that is traditionally wrapped in a sheep’s stomach and boiled – but more often than not nowadays it’s enclosed in a synthetic casing. At this point a lot of people are put off by the description, but it really is delicious. It doesn’t have that rich irony taste that most offal-based products have, and it is lovely and peppery. Frankly, it probably has more actual meat content than many of the cheaper sausages that people eat and love.

Normally, in my household we cook up our haggis and serve it with mashed potatoes, swede, and oodles of gravy. However, this year we decided to try something different, and I thought I’d share it with you.

The main part of our Burns Night dinner this year was Haggis Burgers. The following recipe makes enough for three ½ lb burgers, or up to six smaller burgers.

Ingredients:
  • 1 Onion (Finely Chopped)
  • A Little Olive Oil
  • 350g Haggis (Get it out of the fridge half an hour early to warm up a little)
  • 400g Pork Mince
  • 2-3 Generous Handfuls of Breadcrumbs
  • A Handful of Chopped Parsley
  • 1 Egg (Beaten)
  • Salt
  • 3 Large Baps

Optional Extras:
  • 1-2 Large Cloves of Garlic
  • Sliced Cheese
  • Onion Rings (We cheated and bought some nice ones from the supermarket)


Method:
1. To make the burgers, start off by heating a little oil in a frying pan and gently fry the onion for a few minutes until it has softened but not burnt. A useful tip here is to use a pan with a lid and keep the onion covered for a while as it causes them to sweat and soften without getting burnt. Once softened, remove from the heat and put to one side to cool.
2. Put the haggis and the pork mince into a large bowl, then get your hands in there and mix it together thoroughly.
3. Next, add in the cooled onion, breadcrumbs, parsley, beaten egg and a small pinch of salt. Mix together thoroughly. This isn't particularly easy, but keep at it.
4. Split the burger mix into three balls (or however many you are making with this recipe) and flatten down to make your burgers.
5. Place the burgers on a baking tray (preferably one with a wire rack) and cook in the oven at about 200C for 20 minutes or until cooked through. Alternatively, if making this recipe in the summer, pop them on the barbeque for a nice char-grilled flavour.
6. Meanwhile, Cut the baps in half and lightly toast them, and prepare any extras you want – e.g., cook onion rings, chips, prepare salad etc. (Optional: If you fancy something a little different, peel a garlic clove and cut it in half. Then rub the sliced end over your bun to give a lovely, but not too overpowering, garlic flavour.)
7. Once the burgers are cooked, assemble your burgers and enjoy!

Since we bought a fairly large haggis and we had some left over, we decided to try something out. When I was little, I used to go on holiday to Northumberland to visit some of my Mum’s family, and one year we went up to Berwick-Upon-Tweed, just on the border between England and Scotland, for the day. While we were there, we decided to pop into a fish and chip shop for a warming lunch. While there, we noticed something on the menu that we’d never had before – deep fried haggis. I was only young at the time, but I remember two things about the lunch: firstly, trying to eat this lunch through my hair, which kept getting blown into my face despite my best efforts to the contrary, and secondly, that deep fried haggis is bloody lovely. I haven’t had it since, as it’s not something you tend to see down in the south. However, this year we decided to try doing it ourselves since we now have a decent deep fat fryer. So here’s my quick and easy recipe for Deep-Fried Haggis Balls – it may be horrendously bad for you, but it’s a nice wintery, warming treat. I'm not going to put any measurements on here, because it all depends on how much you want to make up.


Ingredients:
  • Haggis
  • Plain Flour
  • A Small Bottle of Light Beer/Lager
  • Sunflower or Corn Oil


Method:

1. Take your haggis and mould it into sausage shapes and put to one side.
2. Take a bowl and put a few tablespoons of flour in the bottom. Now pour in a little of the beer and whisk together. You want your batter to be the consistency of a slightly whipped double cream, so add more flour or beer as necessary.
3. Place a little flour on a plate and you’re ready to get started.
4. Heat up your oil in the deep fat fryer to 180-190 degrees. (This can also be done on the hob with a large wok if you don’t have a fryer)
5. When the oil is hot enough, take one of the haggis sausages, roll it in the plain flour, then dip it into the batter, making sure that it is coated. Now pop it into the hot oil and let it cook until the outside is a nice deep golden brown (If using a fryer, it’s a good idea to shake the basket a bit as soon as you put in your haggis, to stop it from sticking to the bottom). When cooked enough – this should only take a few minutes – take the sausages out and put on a piece of kitchen roll to soak up any excess oil before transferring to a lined baking tray. Repeat this process with the rest of your haggis until you’re done.
6. Now pop the tray full of battered haggis sausages into the oven at about 150C for 10-15 minutes. This ensures that they are all thoroughly cooked through and that they are all nice and hot. I’ve found that keeping it at a lower temperature prevents the batter from burning, without sacrificing the crispiness.


As an alternative to the above, instead of using batter you can breadcrumb the haggis sausages to make Croquettes. To do this, Roll your haggis sausages in the flour, and then dip into a bowl of beaten egg. Finally roll the dipped sausages onto a plate covered with a decent handful of panko (Japanese breadcrumbs that are available from certain supermarkets). Then cook in the same way as you would with the batter.

Tuesday, 22 January 2013

Kitchen Kit: Knives

So the title of this post sounded a lot less violent in my head, but today I want to blather on for a little bit about one of the most important pieces of equipment in the kitchen: the knife.
The knife is an invaluable piece of kit, because unless you plan to use a chainsaw to massacre your potatoes, or to shred your shallots into chunks with your bare hands like some kind of feral, onion-crazed maniac, you can't get by without a decent blade. When I was younger, using a knife used to scare and intimidate me a little, mainly because of their capability of slicing through your finger just as easily as through a raw sausage - something that I am still fully aware of today. So, I thought I'd share a couple of little tips that might help to make you more comfortable with a blade.


1. Find a knife you're comfortable with

Now this may sound a little odd, but I've found that it really helps. Kitchen knives come in a variety of shapes and sizes, from the long skinny type, to the short dumpy ones. My biggest piece of advice is to find the one you're comfortable with and stick with it. Personally, I love to use the biggest knife that I have - the 12" wide blade - and I use it for everything. I've become so comfortable with it, that using it for whatever I'm chopping or slicing feels right. With the big blade I can easily crush garlic cloves, thinly slice a chicken breast, dice an onion, or chop up fresh herbs. But if a big knife feels too intimidating, go for something smaller. If it's too bulky, pick one with a thinner blade; try different ones, and go with what you prefer. Of course that being siad, there are certain tasks that may require a different type of knife, in which case, use the most appropriate tool, but for everyday cooking, I find it best to use that one knife you're most comfortable with.

2. Make sure the knife is sharp

This really is absolutely imperative. There's nothing more dangerous than a blunt knife, so ensure that your blade is always kept sharp. If it's dull, then it's much more likely that the blade will slip off the item you're trying to cut and head straight in the direction of the nearest finger - and while it may be blunt, it can still do damage. Aside from that, a razor sharp knife, makes any kind of chopping and slicing much, much easier. So keep your knife sharp, as not only are you preventing the loss of digits, but you're making life easier for yourself.

3. Have confidence when using a knife

Yes, this may sound a bit dumb, but it's a worthwhile tip. Don't be too timid when using a knife. Being too aware of what could go wrong, or being overly cautious can sometimes make you more prone to kitchen mishaps. Now I'm not saying go hell for leather and forget the consequences, because that's equally as dangerous, just work carefully and confidently and that brand new box of sticky blue plasters can stay unopened.

4. Work at your own speed

Whenever I watch cookery shows and we see the chef actually preparing the ingredients instead of just tipping them out from one of their "here's one I (meaning some poor lackey) chopped earlier" bowl, the speed with which they use the knife astounds me. There is no way I can chop a carrot at that sort of rate, but you know what, I don't have to. So my next knife tip is to chop, slice and dice at your own pace and when you know how quickly or slowly you work, simply allow the appropriate amount of time when preparing a meal. Hurrying to meet a deadline, will only make you sloppy and stressed, so simply relax, work at a speed that suits you and enjoy cooking.

5. Don't be afraid to cheat a little

Now, by cheat I don't mean going down to the local supermarket and buying a pack of ready chopped onions - that's just lazy. What I mean by this, is don't be afraid of employing the services of a food processor in certain circumstances. For example, there's a ragu recipe that I love, which calls for carrot, celery and red onion to be finely chopped. In this case it's going in a mince dish, so why not make life easier and pop the three vegetables in the food processor and briefly blitz them until they're the desired size. It's quick, effective, and much less hassle than fiddling about with a knife. However, it's only worth employing this method when a recipe specifically calls for particularly fine chopping.

6. Water can be your new best friend

This final tip, is more specific to certain aspects of cooking, and isn't necessary for everyday chopping. At times you may have to cut up something sticky, and this can be a real pain in the rear end as the blade can get really sticky. The best example of this I can think of is if you are making rolled sushi. In trying to cut your big sushi roll into the bitesize pieces they're meant to be, the glutenous rice will often cling to the knife like a particularly needy limpet. This not only makes trying to cut it more difficult, but because there's a certain amount of resistance, you can also end up squashing the sushi roll. Luckily, there's an easy, and miraculous fix. Keep a bowl of water beside you, and before each cut, simply douse the blade. The water will act as a buffer, which will prevent the rice sticking to the knife, and allowing you to smoothly cut through. This same principle also applies to slicing raw sausages, use a little water and the sausagemeat won't stick to the knife; instead you'll have nice clean slices and a much easier job when it comes to washing up the knife. So if you come across something sticky to cut, try wetting the blade.

Well, I think that's it for now, as I've waffled on enough. Hopefully, this has been of some use, and with luck it may help someone out there feel mo confident the next time they pick up a knife in the kitchen.

Wednesday, 9 January 2013

Breakfast Fried Rice

This is one of my ultimate comfort foods. Fried rice is such a versatile meal, and frankly you can pretty much put what you like in it. I got the inspiration for this particular incarnation of the dish when looking through one of Ching He Huang's cookbooks. In there she had a recipe for Salmon and Egg fried rice and a Sausage, Green Pepper, Tomato, and Pineapple fried rice under the breakfast section. After looking at these thinking that they were odd, yet oddly yummy sounding combinations, and I figured, well why not combine Chinese Fried Rice with a Full English Breakfast, and thus the breakfast fried rice was born. Now, it may seem a bit odd to put ketchup in fried rice, but it's not a completely foreign concept as one of the flavourings in the Japanese dish, Omurice (Fried rice encased in omelette) is ketchup. It's a really easy dish to make, yet it is so tasty, and well worth a try if you like the sound of it.

Ingredients:

  • 3 Sausages
  • 200g Rice
  • Groundnut Oil
  • 3 Eggs (Beaten)
  • 4 Rashers of Bacon (Cut into strips)
  • A Few Shiitake Mushrooms (Chopped)
  • 2 Tbsp Tomato Ketchup
  • 2 Tbsp Light Soy Sauce
  • A Drizzle of Toasted Sesame Oil
  • Black Pepper
This dish should serve 2 people as a main meal, but it's also good for one person, which would leave a good portion for lunch another day. Simply reheat in the microwave and it will be good as new.

Method:
  1. Place the sausages on a baking tray and cook in the oven for about twenty minutes. Remove from the baking tray and cut into thick slices about 1 - 1.5 cm thick and set to one side.
  2. In the meantime, bring some water to the boil in a saucepan. As it reaches a rolling boil add in the rice, stirring to ensure it doesn't clump together. Cook until tender and strain.
  3. Heat a little groundnut oil in a wok and when hot, tip in the beaten eggs. Stir the eggs with a spatula and keep them moving. As soon as they start to harden and scramble, remove them from the wok and put them to one side. If using a wok that's smoking this should take less than a minute.
  4. Put the wok back onto the heat and add in the bacon - there's no need to add more oil as enough fat will come out of the bacom. As they start to cook add in the sliced sausages, then add in the chopped mushrooms. Once cooked, remove from the pan and place on a plate. It may seem like a pain removing all this, but it makes it easier to coat the rice in the flavours.
  5. Add a little more groundnut oil to the wok and put over a gentle heat. Add in the cooked rice and stir. Season the rice with a the tomato ketchup, light soy sauce, toasted sesame oil, and a good pinch of ground black pepper. Don't overdo the seasoning. Too much ketchup and it will dominate the flavour, likewise too much Soy Sauce and the dish will be far too salty. Mix thoroughly to fully coat the rice.
  6. Return the bacon, sausage, mushroom and egg to the wok and heat through. Finally, serve and enjoy!

Monday, 7 January 2013

The Obligatory Introduction Post

To say I enjoy cooking would be something of an understatement. I've been out in the kitchen for as long as I can remember. As a young girl, I used to help my Dad cook the dinner at the weekends, of course by cook I mean stand on a little stool so I could reach the counter top and doing a lot of stirring, squeezing of tomato purée, and crumbling of oxo cubes. Occasionally, I was allowed to slice a mushroom under strict supervision - since they weren't going to slip and slide around - and when it came to roast dinners, the Yorkshire puddings were my domain. A couple of decades later, and now it's me in the kitchen pretty much every night cooking up a whole host of different meals.

Despite my love of cookery, I've never had any kind of professional tuition (well, unless you count GCSE Food Technology, which consisted of 'here's a recipe, now go make it'), everything I've picked up has been from relatives, cooking shows, or from pure experience alone. Now that I'm a bit older, and I like to think wiser (though the jury's still out on that one), I enjoy experimenting out in the kitchen, using tried and tested recipes as bases for new creations. In particular, one of my more experimental, and certainly creative, ventures in the kitchen has to be making my own homemade chocolates. Four years at art college, and pretty much the only time I make the most of my artistic side is when I play about with chocolate.

On a more savoury note, I love cooking with spices. Oriental and Indian cuisine are two of my favourite things to cook but for very diffeent reasons. With Indian, I love the combination of so many different ingredients all being mixed together to create such rich and vibrant flavours - that and I kind of feel like a witch standing over her cauldron creating something magical - except instead of eye of newt and batwing, it's a teaspoon of Cumin and a pinch of Garam Masala. When it comes to the more oriental cuisines, particularly Chinese, I love the simplicity and freshness, and the fast-paced cooking. To me there's something exhilarating about working with a smoking hot wok and keeping everything moving to create a fully cooked meal in five to ten minutes.

There are a couple of reasons that I decided to create this blog (and one big reason - namely one of my closest friends - that I actually got going on it). Mainly I wanted to share odd recipes and tips about cooking that I've picked up over the years, but I want to use this to talk about individual techniques and ingredients. I'd also like to use this blog as a place to document some experiments and generally share my love of cooking. It'd be nice if I could inspire someone out there to try something new, or give them an idea that they may not have otherwise had, but I'm not egotistical enough to believe that will be the case. I imagine that most of what I say here will have been said before, but if that's the case, I want to say it in my own way. And if nothing else, I want this blog to be a record for me, something that in years, when I'm old, grey and probably a bit more batty than I am now, I can look back on and still manage to rustle up a decent meal from.